Monday, December 21, 2015

Lavender Hearts

A wedding favour, a stocking filler, a just because gift.

These sweet smelling sachets will banish moths from your cupboards, they will freshen up your glad rags and even send you off into a scented slumber.

Easy to make and fast as lightning to whip up for a last minute gift. 


Here is what you need to get started.

- Fabric. Any scrap fabric you have lying around will do. Or if you want to make coordinating gifts buy a fat quarter bundle. Out of one piece of fabric I made about 12 hearts.

- Wadding or stuffing. Handy tip* Do not buy toy stuffing its so expensive. Buy a cheap cushion insert or pillow and use that, its tightly packed so you get a lot more bang for your buck. The wadding I have was a remnant from a previous project. Stuffing works just as well.

- Scissors, thread, decorations.....sky's the limit!!

- Dried lavender. Available online or at markets. I usually find it at the stalls selling olive oils for some reason. Or make your own there are a lot of tutorials online.


Create a paper template. It can be anything, circles, squares, birds. I chose a heart. There are tonnes of free templates online to choose from.

Fold over your fabric and pin your shape in place to hold it steady. 

You want a front and a back piece so try to align them neatly if you have a recurring pattern.


Using a pinking shears cut around the shape as neatly as possible.

If you are using wadding cut a slightly smaller shape to fit inside the sewn heart.

Using a needle and thread sew a running stitch around the bottom 2 thirds of the shape


Place the wadding in the pocket you have created.

If you are using stuffing loosely pack it into the bottom 2 thirds of the shape.

Now put roughly 2 heaped teaspoons of lavender into your pocket. 

Add some more stuffing, if using, on top.

Finish stitching around the edges as neatly as possible and tie off.


Add any decorations you like. Buttons, ribbons, lace, felt...whatever takes your fancy.

Some pretty packaging and a nice note finishes it off beautifully.


Have Fun!!


Tuesday, November 24, 2015

Annie Sloane Saved My Kitchen

Buying a house is tough. You fall in love with one and it gets swiped from under you before you get a chance to bid. You view so many soul-less boxes you feel like its a never ending wave of 'maybe if it didn't have this floor, or those lights or just why did they put a door there?'

And then it happens, you stand in the kitchen of a strangers house and just know that its your home.

So you fight tooth and nail in the bidding war, win and the next thing you know the keys are rattling in the lock....you're in!!!

And then.......the planning starts!!

We were totally skint after buying our house. We begged and borrowed and bought slightly above our means but the fun thing about that is we are having a lot of fun planning our rooms and mostly in the do it yourself manner. 

Everyone needs a functioning kitchen, ours functioned but my gosh was it UGLY!!! 

If you are a pine lover this house is for you, if pine burns your eyes look away now.

When we viewed the house these were the real estate photos:


My aunt had these floor tiles back in the 90's when terracotta was all the rage. In all fairness these floor tiles are actually fine. I just needed to pull the eye up from the floor where it is immediately drawn. 

We loved the splash tiles, a lovely colour but wrong in this room.

So after a tonne of research on painting techniques and paints I had planned on stripping, priming and painting our kitchen until a friend told me about Annie Sloane. No priming, just painting!!! Amazing!!

Annie does not stock her paints in regular paint stores, they are usually sold in small furniture stores, don't worry its available nationwide you just might have to do some research.

It works on everything!!! Our cupboard doors had a plastic veneer on them, basically mdf covered in a plastic layer to make it look like real wood. Most of it had peeled or cracked away from the fronts so I scraped it off and revealed the naked mdf.


All of the doors had to come down and the hinges and handles removed. 

I used a wood filler to fill the holes of the old handles because we wanted to replace them with new ones. Make sure you sand back the filler when its dry to achieve a smooth finish.


I chose Paris Grey for my cupboards as our walls are white. Its a lovely bluish grey, really soft. The swatches are a bit deceptive I'd recommend getting a sample first and trying it. When I look at this tin and the paint on the doors they look very different.


So what do you do with Annie Sloane Chalk Paint? You bang it on!!! No streaks no smudges it just glides on and dries so fast. Also one tin goes a hell of a long way, i still have some left in the bottom of the tin for touch ups.


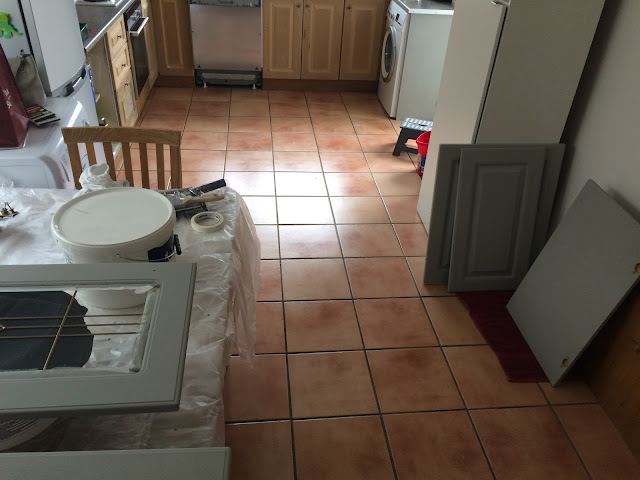
I went between a small roller with a gloss roller on it and a very soft brush for getting into all of the grooves. Each door took minutes!! It was the logistics that took the longest, propping doors on the kitchen table and also doing it in the 2 hour windows i had while my son was at creche.

I painted 2 coats onto the doors and the exterior of the cupboard frames, basically any bit of wood that was visible while the cupboard doors were closed. 

You must also wax your doors to make them waterproof and washable. Annie also provides a fabulous wax, again one tin goes a long way. This takes a bit longer than painting but once you get into a good rhythm its fine.

For the wax I used an angled flat head brush because rather than paint it on you sort of massage it on and then wipe it off with a rag, its quite satisfying I have to admit. 

Note: Waxing alters the colour slightly, it makes it slightly darker so be aware of this when choosing from your samples.

I replaced the handles with a brushed chrome handle from ikea (no one would ever guess) and we replaced the old eyesore of a cooker hood with a new shiny one to match the handles. 


New window blinds and a good scrub and it was done!! A new kitchen for roughly €100 how can anyone complain about that?


Give Annie a go!!

Nic x


Tuesday, November 10, 2015

Its Coding Time

I want a pretty blog and Im broke. So needs must, Im going to learn (more)HTML all by myself.

I married a techy, he lives breathes and oozes code, its his passion and his baby. I enjoy chatting to him about it pretending to have some idea what he's saying by nodding enthusiastically and dropping in a bit of jargon I've picked up over the 8 years we have been together but really....I know very little.

I attended a 2 day course for girls only called Rails Girls. If you are into computers at all and if you are into blogging definitely do this course. It teaches you the basics, how to create your own blog and publish it. It gives you complete freedom, the only snag is you have to build the path to freedom and that is hard and takes time.

It was 3 years ago and now Ive forgotten pretty much everything so its back to basics, HTML.

My goals.....for now,

Navigation: I like different things so I want my blog to have a nav bar that has my posts separated into categories so they are easy to find.

Design: I have to come up with a design I like that is easy to implement.

Watch this space!!

A Bash at Skeleton Leaves

Do you love crafts that are challenging where defeat is not an option?

Skeleton leaves are one of those crafts that scream difficult so I had to give it a go. 


Advice tip: Do not do this if you are in a hurry, or in a bad mood. You need time and patience, its a tedious and rather stinky project.

My first mistake, discovering skeleton leaves at the turn of the season from Summer to Autumn. Leaves that have decayed and fallen do not work. 
You need beautiful lush green leaves....or something close to it. 

To the park!!

Did we do a good job?
My son loves rubbing leaves with crayons, well watching me do it. You know when you get the pattern through the paper. So I promised him we would do it if he helped me find green leaves first. 

We chose an oak leaf, a lime tree leaf, an ivy that grew on the lime tree and a few laurel leaves.

I researched a few tutorials and it seems there are 2 ways of doing this. The water soaking way which takes nearly a month, or the chemical route that is done in a few hours. Im an impatient scientist so give me the chemicals please!!

The tutorial I used was from icreativeideas.com and here it is!!

Wow it takes so so so long to get the flesh off the leaves. I used a variety of utensils, an old baby toothbrush, a chunky kids paintbrush and a soft artists brush. 

The skeletons are stronger than you think and can take a serious pounding from the various brushes. 

The laurel leaves did not work, They just turned brown and hard and went straight into the bin.

The oak leaf resulted in this 
I punched and pounded and this was all the flesh that would come away after 30 minutes so I left it at that.

I have to say for a first attempt I'm pretty happy. You can see the skeleton quite clearly and it has an ugly beauty I am drawn to. 

Next the lime tree leaves. 

The first one went pretty well but if you look along the spine in the centre the leaf started to separate so I abandoned ship and moved onto the second lime leaf I had and....

Success!!


Its such a pretty leaf. I know its not 100% clean of the flesh but I like that.

Finally though.....the ivy leaf was the most surprising. When i took it from the pot it had completely warped. The skin on the front and back of the leaf peeled off easily in my hand and magically after a tiny bit of brushing and a rinse this is what I got...

The stem fell off but look at those beautiful veins. Im thrilled to bits with this leaf its so delicate.

Some people bleach the leaves to remove the colour but I like the dirty green plus I want to mount one of them onto a frame I got today in Penneys (or to those outside of Ireland Primark) for €4. 


I have to say this is a very cheap project which is nice. The washing soda was €1 and the leaves were free. Not too bad eh?

I have to go now and figure out how I'm going to mount the leaf onto a glass pane. 

Keep a look out for the finished product!!

Happy skeletonising,

Nic x


Monday, November 9, 2015

Wedding Fans for our Ceremony

For our wedding back in June we had a truly special day. My husband and I chose a Humanist ceremony. 

From beginning to end it was all about us, our family and our friends. Every word meant something.

We had members of the family participating and 90% of the congregation had never attended a humanist ceremony so we required something outlining the order of events.

The actual ceremony is only roughly 20 minutes long so booklets weren't needed and I have seen so many scrolls at other weddings we wanted to do something different.

We got married at the end of June and in Ireland that could mean anything from blazing sunshine to hail and rain....luckily we got the blazing sunshine. And what does everyone need when they are hot? A fan!!! Perfect. 

Here they are!!


I still love them. Heres how I went about making these beauts!!


First things first...ideas.....Pinterest!!

There are loads of beautiful fans on Pinterest so I had plenty of inspiration. We took a few ideas from these fans.


How pretty are the ribbons on these? The peach is so elegant. 


Or the chalkboard effect on these? They're so unique!! These are available on Etsy if DIY isn't an option. Actually there are a huge amount of fans on Etsy the possibilities are endless. 


However beautiful the fans on Etsy are we simply couldn't afford them and the shipping is always so costly so we went the DIY route. 


Chelsea Day from the blog 'Someday I'll Learn' made this beautiful fan and the tutorial to make it is here.


I bought a box of blank A6 white cards and envelopes, we used the envelopes for another project. The cards were perfect because they were already scored and folded. Plus you can choose from so many colours.


Next I ordered the wooden sticks. 

Lollipop sticks are neither long enough nor strong enough so it makes more sense to get the jumbos they are really cheap.  
If you type 100 'Natural Wavy Jumbo Wood Fan Handles Wedding Fan Sticks' into eBay you will get the links. For €16 these were a bargain.

Finally I got an edger....one of these amazing devices. A corner cutting tool. It makes ordinary card suddenly elegant.

My husband (the designer) mocked up the design and we carried this through all of our stationary.

The hardest part was to get the buggers to print without smearing or streaking.....3 different printers and memorising which direction to put the paper in we had a result!! 


We glued the sticks to the inside of the cards and folded them over. 

TIP: Do not use spray adhesive. It lures you into a false sense of security that all the cards have stuck and one by one they popped open. Stick to good ol' Pritt Stick or any glue stick. The cards had a finish that didn't like the spray so go with the glue stick.

Strolling around Dunnes Stores I found very cool flamingo ribbon it just attached itself to my hands so I got a few rolls and tied them around the base of the paper on the stick. It just finished them off nicely.


When you are making these remember the guys typically don't appreciate pretty things. Save yourself some money and just make enough for the women of the party who will oooooh and aaaaaah and even steal the idea for themselves (thats when you know you've done something unique and special).
Here is the father of the groom holding his wife's fan. He's a gent!


Nic xx  


Wednesday, November 4, 2015

Getting on with things

This past year has been busy. 

We........
Moved house 
Moved schools
Got married
Travelled to Italy
Started renovations
Sold 34 items that needed rehoming
Welcomed 2 new baby boys to the immediate family and loads of friends new babies to our extended family
Crocheted countless gifts
Baked countless cakes
Attended a very sad funeral
Celebrated 2 christenings
Celebrated 3 birthdays
Attended 6 weddings 
Broke a foot (mine) 
Christmas, Easter, Halloween etc etc

And still from one day to the next i did very little 'me things'! Reason being....down right laziness!!!
So, goals and lots of them are needed before time passes me by! 

So i think short term to start.
- make lavander pouches for christmas presents
- write tutorials on the DIY items i made for my wedding
- write tutorials on DIY items Im currently making for my sisters hen party and wedding
-take more photos!!

I have one month to do all of these! 

Lets go!!

Friday, October 30, 2015

Upcycle an Ugly Sewing Box

My very first sewing box, a sorry sight indeed. I think I was about 10 when my mother bought this for me and although it was well used and very much loved it was a major eyesore....so a revamp was in order!!


Here's how I did it....

Most of the embellishments like the lace trim and bow were just glued on and came away easily when gently pulled.
Next came the removal of the pre-existing fabric, not an easy task. In the end i decided to leave the fabric around the sides as it was glued tightly to the box. The lid was easy to remove, it was just a piece of cardboard with a layer of foam inside, classy I know!! Lastly the handle, this was held on by 2 little pins which popped out easily enough with a set of pliers. the fabric just slipped off as it wasn't glued to anything, easy peasy.

Next I painted my bare sewing box white with some acrylic paint I had lying about. It was perfect and gave the box a nice finish.

Then the tough part, covering the box with my new pretty fabric.

The centre piece I cut to the exact height of the space between the top and bottom rim, and using latex glue (copydex) simply glued this piece over the existing fabric making sure to make a little hem on the crossover to keep it neat.

The lid was easier to cover than I thought, I covered the piece of cardboard with a square of fabric making sure the corners folded neatly so there were no major lumps or bumps. When the glue dried I then placed a sheet of card on the inside of the box hiding all the seams of my fabric. To keep the lid on my sewing box I glued a piece of fabric to the lid and to the inside of the box and added a little ribbon to make sure the lid didn't fall off every time I opened it.

Lastly the handle required a piece of fabric sewn into a tube shape and the handle was passed through this to cover it.

And here is the finished product!

If you have an old sad sewing box, don't get rid of it, just give it a much needed facelift.

Sure you may as well!!!